Building a portable soldering station
Fri 26 September 2025 by JuliaThis project started shortly after I bought myself a new USB-C soldering iron. There's lots of these out there, but I chose the S60 Soldering iron from Sequre. Primarily I chose this over other options like the Pinecil because it uses tips that are compatible with the C210 tip system from JBC, meaning there's lots of 3rd party compatible tips out there.
Having got the soldering iron and used it a bit off the mains, I wanted something more portable. As with many of my builds, a moment of inspiration came from Laura Kampf and her Portable soldering station. Adam Savage has also made something similar. My first thought was to get a power bank that could do usb-pd of various voltages, as none of the numerous powerbanks I had could do more than 5v. But the cost of a new power bank was a bit off putting. I'm not sure on which project I saw it on, but somehow I came across this USB-C PD Module that can take 6-34v in, and output various USB-C compatible power delivery standards including the USB-PD necessary for the soldering iron. Now I just needed something that could output something in the 6-34v range...
For my power tools I have standardised on the Makita 18V LXT range. I have a number of the LXT power tools, and a slightly smaller number of the batteries. A few of my making friends in the Amsterdam area have similarly standardised on the LXT platform, lending the tools between us when we need one that we don't own, just bring your own battery. I wondered if I could somehow use one of these 18v makita batteries for my soldering station? A quick look on thingiverse, brought up this Makita LXT 18V Battery Mount. There's lots of other Makita 18v LXT mount projects on thingiverse and printables, but I chose this one as it had four screw holes in the corner. It does require a Makita 643852-2 batttery terminal, which I got off ebay. I bought a pack of 3, figuring I may want to make other projects powered by a Makita battery.
At this stage, I have a battery platform, a means to connect to it, and a means to mechanically attach to it. Now I just need some means to hold it all together. For this I turned to my CAD software of choice - OpenSCAD. To make life a bit easier I used this Nut and Bolts Library to do the modeling of the screw holes and nut holes. After a couple of hours I had some of the most ugly OpenSCAD code I'd ever written, but it produced a model that looked about right.
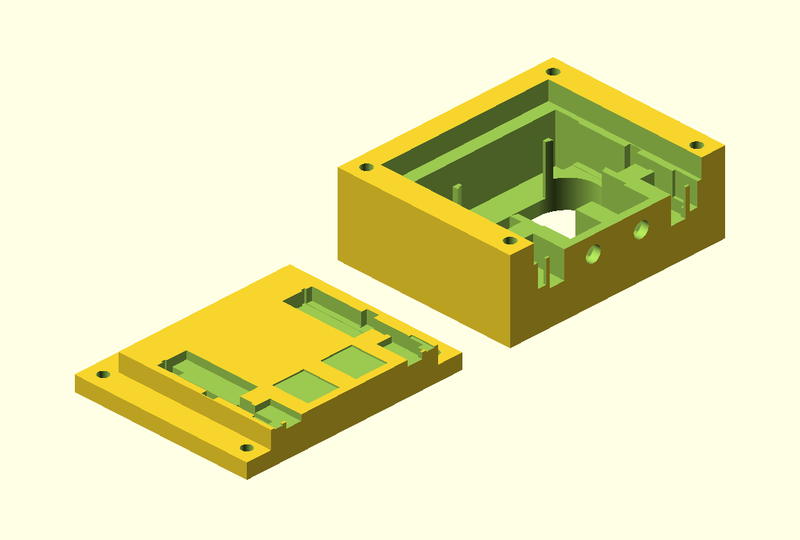
The dimensions were largely dictated by the dimensions of the makita battery adapter part. I decided to make the housing take two of the USB PD boards, this gives a total of four outputs, tho if you use both outputs on the same board, then the voltage on both drops to 5v. My thinking is that I might use one of them to power a USB fume extractor or similar. I also added a couple of double pole single throw switches. The link to the exact ones I got off aliexpress is dead, but there's hundred of them that are essentially the same.
All that was left now was to print it and see if it works. At the time I did not have access to a 3d printer, fortunately my friend Matt has a Prusa 3d printer he felt wasn't getting enough use, and he was happy to print the parts for me. The two parts are in different colours because he first printed the battery mount in red, so that I could take measurements off it. Then the part that attached to it was printed a bit later in blue.
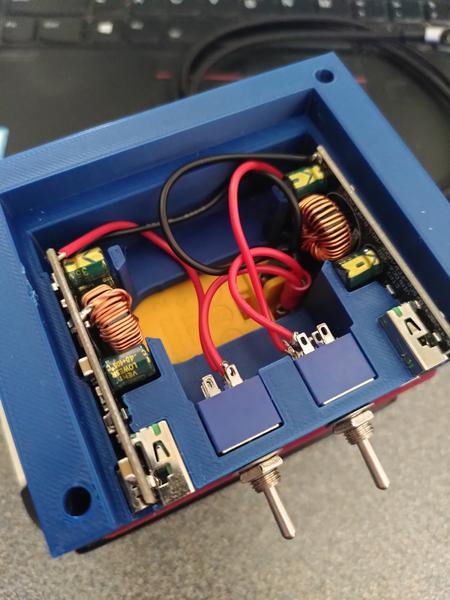
Test fitting all the components. Amazingly everything fit first time. There's a couple of very thin vertical strips on the front that split the USB-C and USB-A connectors on each board. These are annoyingly, and unsurprisingly, fragile. Also somewhere along the line I screwed up the dimensions leaving a large horizontal gap across the front. Which is for... um... er... Ventilation. Yes it's there for ventilation... Honest. The whole thing is held together with four 45mm M4 screws and matching nuts. Although initially I tried with 55mm screws, as the 45mm ones didn't arrive in time.
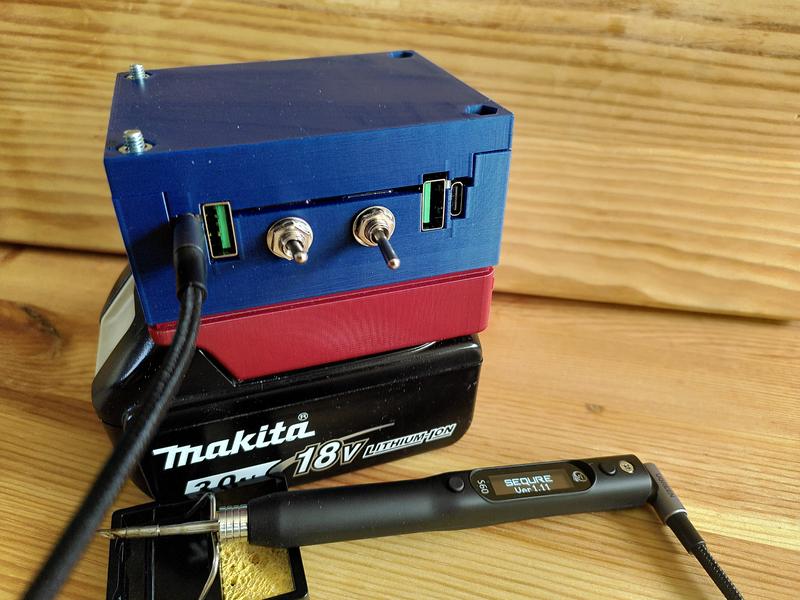
It works! Ignoring the minor issue with the uh, ventilation. The design works. Whilst I originally made it for soldering with, it's become a generally useful USB-PD power supply. I've even managed to run a Macbook off it. While the headline voltage of a Makita LXT battery is 18v, at full charge it's actually over 20v. So you can get 20v out of the USB-C port.
Now I have a USB-C PD power unit that with a 5Ah battery provides almost 100Wh of power, I've been looking at other projects that it can power. But that's for a future blog post.
Future improvements
The current version is a prototype, and as with many prototypes, it's been sufficiently good that it's been in use now since I made it in August 2023. I have however found some areas that I think could be improved. Primarily it's not easy to tell if the switch is on. Meaning if you forget to switch it off, you flatten the battery. Makita batteries really don't like being fully discharged. There is a blue LED on the board that works as a power status, but it's not visible from outside the unit. I'm wondering if there's a way I could add some sort of light pipe or similar to get the light visible from outside. I'm also pondering including an "On" and "Off" label into the 3d print. Or maybe I'll just add a label with a label maker...
I'm also thinking of making a better soldering iron holder that can attach to the top of this power unit. As well as a mount to hold a fume extraction unit. But that's a future project.
If there's enough interest, I may put an improved version of the power unit (without the ventilation) up on printables. But it's not there yet.